Challenger 2: Difference between revisions
No edit summary |
No edit summary |
||
| Line 370: | Line 370: | ||
'''X''': Driver, backup. Instructs the driver to reverse.<br> | '''X''': Driver, backup. Instructs the driver to reverse.<br> | ||
== Links == | == Links == | ||
Revision as of 04:51, 12 December 2011
Challenger 2: Main Battle Tank
Statistics
Main gun: rifled 120mm L30A1 with 2-piece ammunition
Coaxial machine gun: 7.62mm L94A1 chain gun
Loaders MG: 7.62mm FN MAG
Combat weight: 62.5t
Engine power: 1200hp
General
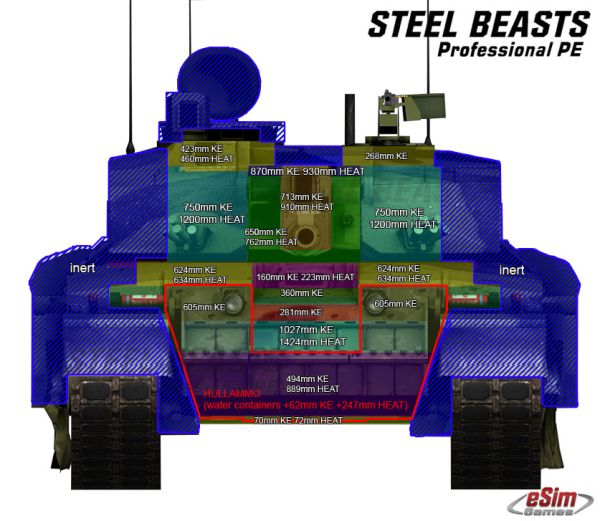
The Challenger 2 is the upgraded variant of the Challenger 1 purchased by the British military in 1998. It is generally considered the best protected tank in the world, because of its heavily sloped front turret, and Dorchester armour. The Challenger 2 also has some features to reduce post penetration damage. It does not have a compartmentalized ammunition stowage, like the Abrams or Leopard. Instead it has the propellant charges stored in water-filled containers; this reduces the risk of the rounds catching fire if the charge bins are struck.
The Challenger tank simulated in SB, is the "desertized" variant, which has added ERA tiles on the hull front and EXTRA ARMOUR on the sides; this gives the Challenger 2 better all around protection against most HEAT warheads. Unlike other western tanks, the Challenger 2 has a hydropneumatic suspension, which gives it a nice and soft ride, and also increases internal space slightly. The Challenger 2's fire control system is distinctively British, featuring two separated sights, one thermal, and one daysight. The daysight is made by Thales Optronics, and is stabilized and equipped with a laser rangefinder. The sight itself has a two axis head mirror stabilization system, so the reticle parts are all stationary, like those of the Leopard 2 and M1A2 Abrams. This makes engaging targets easy for the gunner, because all he has to do is align the center bullseye on target, hold it on for ~1.5 seconds, and give the fire control system an accurate enough solution for a hit. The thermal sight is also made by Thales optronics, however, it is mounted separately from the daysight, with rather poor decision making, on the L30A1 rifled cannon's mantlet. The sight does not have any stabilization itself, as it follows the cannon's stabilization, making life somewhat confusing for the gunner who has to switch between daysight and thermal sight constantly. The sight uses the daysight's laser rangefinder, as the mantlet does not have enough space for an LRF assembly. Because of the fact that the sight follows the cannon, the reticle parts in the narrow field of view mode can freely move within the 2-dimensional space observed by the gunner. After lasing, the sight jumps to the required superelevation required by the fire control computer, and moves in the horizontal plane depending on how much input the gunner gave to his handstation in the ~1.5 seconds before the lase, and moves also after the lase depending on how much input is given to the handstations as well.
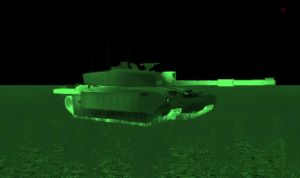
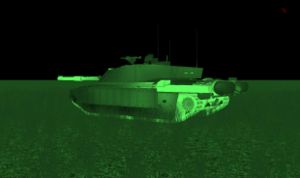
Thermal Signature
Crew Positions
Tank Commander's Position F7
In Steel Beasts the tank commander's (TC) position on the Challenger 2 is fully crew-able but partially modeled. Currently the user has no interior 3D view, the user's head pans from external view to the vision blocks. Also available are the sight optics, for the GPSE and the Commander's Periscope. The TC's position is accessed by pressing F7.
From this position the user can raise and lower their perspective (and exposure level) by holding the Q key (to go up) and the Z key (to go down). The TC can also button or unbutton (close and open the TC's hatch) by pressing the B key (toggle). While unbuttoned, the TC may also wish to use binoculars to get a closer view on a distant area by pressing the N key (toggle).
The TC also has smoke grenades at his disposal. The TC can fire smoke salvos by pressing TAB, once all loaded grenades are expended the grenade launches will need to be reloaded.
- The usefulness of the smoke grenade launches should not be underestimated, and it is one of the most useful tools at the disposal of the TC. Smoke grenade launchers are a vital tool for the security of the vehicle and should be used for a variety or reasons. These include, but are not limited to: attempting to break contact with the enemy, protection against non thermal sight equipped threats, and protecting the vehicle from enemy attempts to range you with an laser range finder. At the same time, care should be taken on when smoke is deployed since you are basically announcing your location to anyone else who might be unaware of it.
Commander's Periscope (PERI)
The commander's periscope is mounted in a fully independent and traversable sight.
The TC can access the PERI sight by pressing F3.
Once the user is at the PERI gun sight, the user can traverse the sight using either the mouse, or joystick (both of which represent the cupola's powered traverse mode). In the PERI sight, you will notice a red "T" symbol that moves around the edges. This denotes the current direction of the gun.
When the fire control system and turret drives are functional the commander can align the gun and the PERI by using the Joystick HAT-UP or UP ARROW and HAT-DOWN or DOWN ARROW. "Up" corresponds to the commander overriding the gunner's controls, bringing the turret to the current PERI alignment. The Challenger 2 differs from other PERI sights however, in that holding the P key (grips) slaves the PERI to the gun, allowing the commander to observe the gunner's target. Down cancels the gun-Peri alignment and allows gunner and commander to scan different sectors again.
While in the PERI view, the commander can lase and get a range (when in high magnification only, press N to change magnifications). Once lased, the commander will see "CLRF SURV" followed by the range. This lase is only for observation / survey purposes. The Challenger 2 commander can also access the thermal sight through the PERI, but only by overriding the gun with UP ARROW, then NUM PAD * to turn on the thermal sight view.
Commander's IR Sight
The commander may choose to observe what the gunner is aiming at through the IR sight, which is accessed by pressing F2. The IR sight allows the commander to observe the strike of the round and call for adjustments, however the commander does not have direct control over the gun and turret in this view. To assume control of the turret in this mode, press UP ARROW and move the turret in the area desired, then press DOWN ARROW to give control back to the gunner once you have put him in the proper direction.
Note that in all fire control modes, a "C" will be displayed in the bottom of the sight (to the left of the ammunition type) when the commander is overriding the gun.
Commander's vision block view
On some occasions the TC may need to quickly look around the vehicle without having to spin the turret and without having to expose himself to hostile fire. Although the PERI allows this, the Challenger 2 retains conventional vision blocks as well. The vision block view allows the TC to remain safely inside the vehicle and quickly scan around for close threats. It is most useful when enemy infantry are in the immediate area. Access the TC's vision block view by pressing F1 (since there is currently no eye/interior view).
Once in the vision block view, the mouse or joystick can be used to quickly and seamlessly pan the TC's view from vision block to vision block, allowing him to scan around the vehicle. While the vision block view completely protects the TC from hostile fire, it does have an extremely limited field of view and offers no magnification.
Key listing for Challenger 2 TC's position
General Commands:
TAB: Pop smoke. Launches smoke grenades to deploy a smoke screen in the direction that the turret is facing. Useful for breaking up enemy LRF or completely obscuring your vehicle against a non thermal sight equipped threat.
P: Grips. Moves PERI to current gun position and disengages the turret when overriding from the IR sight.
Q: Raise position in hatch. Moves the TC's view and exposure level up in the hatch.
Z: Lower position in hatch. Moves the TC's view and exposure level down in the hatch.
B: Button hatches. Moves the TC's view down and closes the hatch. This is useful for protection from artillery and small-arms. A second press unbutton's the hatch, to a covered-protected position, with a third press opening the hatches completely.
N: Multipurpose zoom (toggle). When the TC is unbuttoned, this will bring toggle the binocular view. When the TC is inside the turret this key will make the TC lean forward, essentially zooming in on that spot in the turret. In PERI mode this switches between high and low magnification.
LEFT ARROW / RIGHT ARROW: When in the TC's eye view F1, pressing these keys will cause the TC to face to the left or right of the main gun (turret).
UP ARROW: Multipurpose. When in the TC's eye view F1, pressing this key will cause the TC to face in the direction of the gun (turret). When in the TC's PERI, initiate Override.
DOWN ARROW: Multipurpose. When in the TC's eye view F1, pressing this key will cause the TC to face to the rear of the turret. When in the TC's PERI, releases control of the gun back to the gunner when overriding.
NUMPAD *: When the commander is overriding in PERI, turns on the IR sight.
Driver related commands:
SHIFT + BACKSPACE: Shut down / startup engine (toggle). Orders the driver to shut off or start up the engine. If the TC is a platoon leader then it orders the platoon to execute a "short count" and simultaneously shut down or start up their engines.
W: Driver, move out. Instructs the driver to move forward (press again for increased speed.
S: Driver, stop. Instructs the driver to stop.
X: Driver, backup. Instructs the driver to reverse.
A: Driver, go left. Instructs the driver to go left (hold the key).
D: Driver, go right. Instructs the driver to go right (hold the key).
Gunner related commands:
BACKSPACE: Battle sight range (BSGT). This key represent the "BSGT" button on the commander's control panel which, when pressed, puts 1200m into the ballistic computer and dumps all lead calculations. This button should be used when the TC wants to gives a battle sight engagement, basically a tank becomes visible at 1200m or less. With battle sight in place, the gunner need not lase the target, he only needs to point and fire.
SPACE BAR: Multipurpose. Orders the gunner to fire at a target he is looking at when not overriding the gunner. If the TC is overriding the turret, the this will fire the main gun.
H: Hold fire. Orders the gunner to hold fire. If the TC is a platoon leader then it will also order the platoon to hold fire.
F: Fire at will. Orders the gunner to fire at will. If the TC is a platoon leader then it will also order the platoon to fire at will.
E: Engage. Orders the gunner to engage, and instructs the driver to take up a battle position. If the TC is a platoon leader then it orders the platoon to engage and take up a battle position in the direction of the user's view.
,: Manual mode. Orders to gunner to put the turret in manual mode.
.: Emergency mode. Orders the gunner to put the fire control system in emergency mode.
/: Normal mode. Orders the gunner to put the fire control system in normal mode (default). This is the only mode in which the Leopard 2A4 commander can override.
M: Coax / Main gun (toggle). Orders the gunner to toggle between the main gun and coax to engage targets.
SHIFT + LEFT ARROW: Gunner, scan left. Orders the gunner to put move the turret approximately 45 degrees to the left and scan for targets.
SHIFT + RIGHT ARROW: Gunner, scan right. Orders the gunner to put move the turret approximately 45 degrees to the right and scan for targets.
SHIFT + UP ARROW: Gunner, scan front. Orders the gunner to put the gun over the front and scan for targets.
Loader related commands:
INSERT: Fire, fire FIN (KE). Orders the loader to start loading FIN after the next round is fired. Holding SHIFT and pressing this key will instruct the loader to reload this round type from the semi ready rack.
DELETE: Fire, fire HESH. Orders the loader to start loading HESH after the next round is fired. Holding SHIFT and pressing this key will instruct the loader to reload this round type from the semi ready rack.
HOME: Fire, fire (ammo type 3). Orders the loader to start loading ammo type 3 (if there is any) after the next round is fired. Holding SHIFT and pressing this key will instruct the loader to reload this round type from the semi ready rack.
END: Fire, fire (ammo type 4). Orders the loader to start loading ammo type 4 (if there is any) after the next round is fired. Holding SHIFT and pressing this key will instruct the loader to reload this round type from the semi ready rack.
SHIFT + PAGE DOWN: Reload all. Orders the tank crew to reload all weapons systems.
Note: You should be turret down before reloading the ready rack as the turret must be turned to the 5 o'clock position to access the stored rounds.
Gunner's Position F6
In Steel Beasts the gunner's position on the Challenger 2 is fully crew-able, but partially modeled. The gun sights can be accessed but a interior view is not present. The gunner's position is accessed by pressing F6.
Gunner's Primary Sight
This gunner's primary sight (GPS) is the primary sight the gunner utilizes to engage and destroy targets. The GPS view is accessed by pressing F2.
The GPS sight is daylight only and is mostly used when the IR sight is damaged or, in good visibility conditions, to better identify targets. If you are currently in the IR sight view, you can switch to daylight view by pressing the + key (on the num pad).
The zoom level in the daylight sight can also be toggled with N and it is independent of the zoom level set in the IR sight.
Sight Symbology
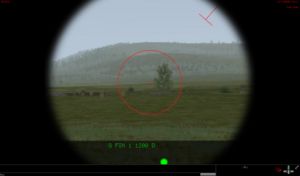
In both the IR sight and daylight view, you will see a set of nearly identical symbols in the bottom of the sight and a reticle in the center of the sight: these are referred to as the gun sight symbology.
The GPS aiming reticle is located in the center of the appropriate sight and is used for aiming at the target. The center of the reticle is a dot surrounded by a circle. The center dot is the aiming point for lasing and firing. In low magnification, a larger red circle appears around the center reticle. This large circle denotes the field of view of what the sight will be when switched to high magnification.
The set of numbers in the lower part of the sight is the range, in meters, that is currently entered in the fire control system (FCS). This range is either entered manually by the user, or entered automatically when the laser range finder (LRF) is used, the latter being the most common and is referred to as "lasing". To the right of the range is either "LAST" or "FIRST" denoting the LRF setting (either last or first return on the laser). To the left of the range is the currently loaded/last fired ammo type, displayed as either "FIN" for sabot rounds or "HESH" for HESH rounds. To the left of the ammo type is a letter, either "G" or "C" denoting who has current control of the turret (G = Gunner, C = Commander). Below that is the red color read-to-fire light which lights up when the gun is ready to fire.
The Challenger 2's weapon systems cannot be fired when in either GPS or IR sight low magnification, you must switch to high magnification to engage. You can see this by observing the text "SELECT HIGH MAG" in the sight picture. If shown, then you must switch to high magnification to engage, at which point you will see the red color ready-to-fire light if the gun is loaded and in coincidence with the gun sight.
Thermal Observation and Gunnery Sight (TOGS)
A supplemental view to the GPS view is the IR sight, which is a separate sight picture. Activate the TOGS (aka. IR sight) by pressing + on the num pad.
In low magnification, the reticle will display a set of brackets around the center of the sight. These brackets show the area/field of view that the high magnification will zoom into. The IR low magnification sight is used to quickly scan the terrain, looking for any hot spots that stand out in the view. Once a heat signature is spotted, press N to zoom in, switching the sight to high magnification.
In this view you can track, lase and engage a target. The IR sight high magnification view is excellent for engaging targets that may be behind woods or vegetation, behind thin clouds of dust, and behind non multi-spectral smoke screens. The IR sight is also at an extreme advantage over non thermal sight equipped foes in low visibility conditions such as night, poor weather, or fog. The disadvantage of the IR sight view is that target identification can be difficult, especially at long range (depending on the quality of the sight). As a trigger puller, you need to be extremely certain that what you are observing is an enemy vehicle before you commit an act of fratricide. The best way to be certain of this (in good visibility) is to switch to daylight view once a target is acquired. That said, gunners with experience will memorize thermal signatures of all vehicles to the point that they can identify targets in the IR sight as effectively as they can in daylight view.
- On the Challenger 2, the thermal sight is mounted directly above the main gun tube. This results in an awkward behavior where the IR sight picture will elevate when the gun elevates, and the gun sight will drop in the sight to compensate. With HESH loaded, long range engagements may cause the reticle to move off the bottom of the IR sight picture. This strange behavior is normal, the gunner would fire then reset the sight to observe the strike of the round and repeat (more on this below).


