Using the Mission Editor: Difference between revisions
No edit summary |
(Added section "Creating Heterogeneous Units") |
||
| Line 55: | Line 55: | ||
Depending on the number of vehicles in a platoon, a divided unit will either become a section (two vehicles) and single, or two sections. Leopard platoons are composed of three tanks, so Dividing a Leo platoon, for example, will produce a section and a single. A platoon of M1A1s, on the other hand, will Divide into a pair of sections, each with two vehicles. | Depending on the number of vehicles in a platoon, a divided unit will either become a section (two vehicles) and single, or two sections. Leopard platoons are composed of three tanks, so Dividing a Leo platoon, for example, will produce a section and a single. A platoon of M1A1s, on the other hand, will Divide into a pair of sections, each with two vehicles. | ||
'''Creating Heterogeneous Units''' | |||
In SB Pro PE, platoons consisting of different types of vehicles may be created. In order to do this, first divide the platoon as described above. | |||
Once you've divided your platoon, | |||
[[Image:Attaching_units_3.jpg]] | |||
You can go through it and re-set the type of each particular sub-unit. | |||
[[Image:Attaching_units_4.jpg]] | |||
Homogeneity isn't necessary. | |||
[[Image:Attaching_units_5.jpg]] | |||
When you've got your types reset, you can re-attach them (you may need to move the units close to each other in case you've moved them after separating them). | |||
[[Image:Attaching_units_6.jpg]] | |||
There you go. | |||
[[Image:Attaching_units_7.jpg]] | |||
''Nota Bene'' You may need to test the heterogeneous platoon once you've created it to ensure that it moves in formation as you expect it. In other words, the number vehicle should assume its position in formation despite its type. Furthermore, as of the writing of this article (SB Pro PE version 2.483), reattaching a tank with a mineplow or rollers to a heterogeneous platoon may result in anamolous behavior --- the plow or rollers may be swapped to another vehicle. | |||
Revision as of 05:23, 1 August 2010
Once a map has been selected or generated, it’s time to put the pieces down. The scenario you wish to create will dictate where the units go, and how many/what type of each you will need. Don’t worry if you’re not sure about where to start units, that’s part of the design process.
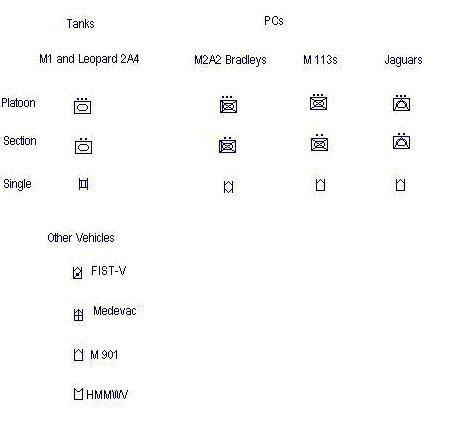
There are four basic types of units: Tanks, PCs, reconnaissance vehicles, and infantry. There are three categories of units; platoons (indicated by three dots over the unit symbol), sections (indicated by two dots over the unit symbol), and single vehicles (given as a diagrammatic representation of the vehicle type). Infantry follow the same convention, with the exception that a ‘single vehicle’ of infantry is a squad, and is represented by an infantry symbol with one dot above it.
The first illustration shows units used by NATO forces
The second shows Soviet units
Note that forces of either side can start play with either side. A design can give the Soviets M1s, M2A2s, and so on. NATO forces can start with Soviet tanks. The scenario A Village Called Netreba does just that, giving the player T-80s and T-72s as part of the NATO order of battle.
This is also useful for designs which want to give both sides playable tanks. Commonly, when this occurs one side is given Leopard 2A4s and the other M1s. The designations Blue and Red are simply that, included in the game only to delineate which side owns which units. It’s not uncommon as well for designs to mix and match APC types, too. Some players prefer the low silhouette of Jaguars or BMPs, for example and will happily mix them with M1s if it suits their purpose.
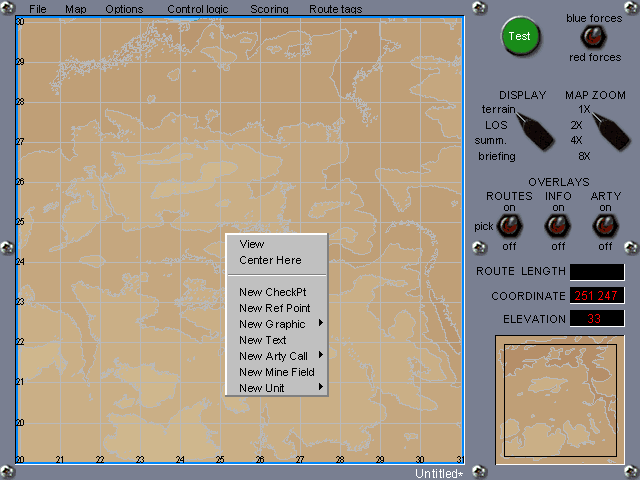
Placing units on the map is done using the Mission Editor. Select a map, or create one (as described in Chapter 3), then do the following:
Right-click. This brings up the menu shown below.
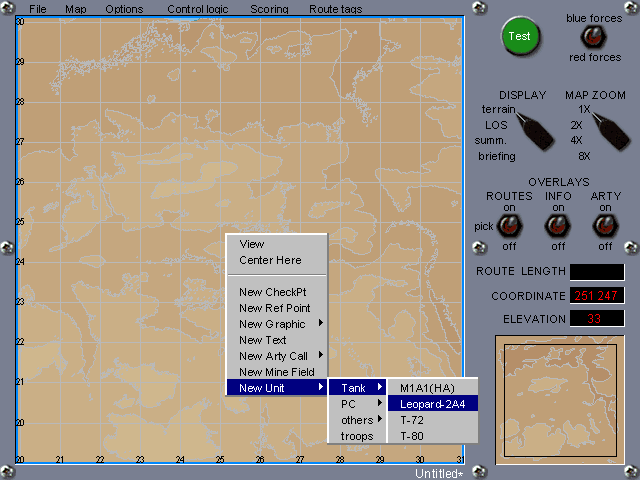
Put the arrow over New Unit. Another menu appears:
Putting the arrow over Tanks opens another menu.
Again putting the arrow over a specific tank, right-click.
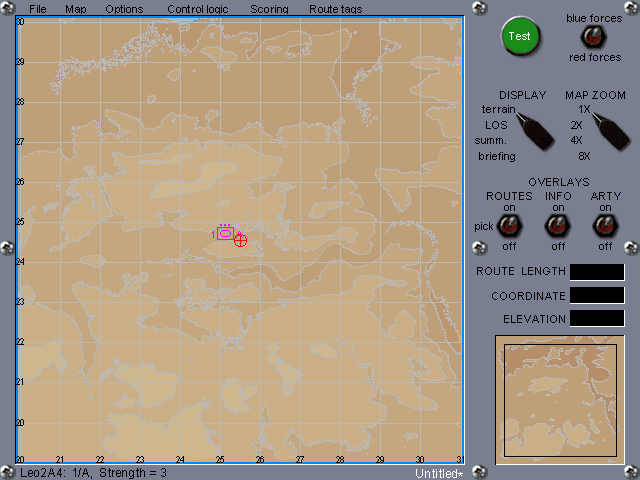
You’ve just placed a tank platoon on the map. By selecting from the menus you can put down infantry, PCs, and other vehicles, just the way I did for the platoon of Leos.
Units on the map can be moved once they’ve been placed. To move a unit, right or left-click on its symbol.
See how it turned pink? That’s the visual cue telling you that you can now move the unit.
To move a unit, place the arrow over it, left click (and hold the left mouse button down), and drag the symbol to where you want it.
For this example I moved the Leo platoon a little north and east. Releasing the left mouse button leaves the unit where you wanted it.
Units can be subdivided as well.
To divide a unit, select the unit by left-clicking the units icon, then right-click. A menu will appear. The second entry on that menu will be Divide Unit. Left-click again. The unit should have split itself into a pair of sub-units.
Depending on the number of vehicles in a platoon, a divided unit will either become a section (two vehicles) and single, or two sections. Leopard platoons are composed of three tanks, so Dividing a Leo platoon, for example, will produce a section and a single. A platoon of M1A1s, on the other hand, will Divide into a pair of sections, each with two vehicles.
Creating Heterogeneous Units
In SB Pro PE, platoons consisting of different types of vehicles may be created. In order to do this, first divide the platoon as described above.
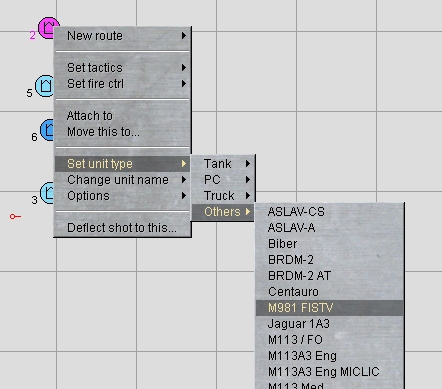
Once you've divided your platoon,
You can go through it and re-set the type of each particular sub-unit.
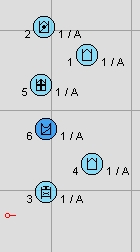
Homogeneity isn't necessary.
When you've got your types reset, you can re-attach them (you may need to move the units close to each other in case you've moved them after separating them).
There you go.
Nota Bene You may need to test the heterogeneous platoon once you've created it to ensure that it moves in formation as you expect it. In other words, the number vehicle should assume its position in formation despite its type. Furthermore, as of the writing of this article (SB Pro PE version 2.483), reattaching a tank with a mineplow or rollers to a heterogeneous platoon may result in anamolous behavior --- the plow or rollers may be swapped to another vehicle.
Removing units
There will be situations where you will want to create a scenario with say, thirteen M1A1s, or fifteen Marders. Or maybe you lost track of what you were doing for a moment and created one more platoon than you wanted. Dividing units will go some of the way toward getting you to the number you desire, but you will usually find that there are excess vehicles remaining. The mission editor doesn’t know that you don’t want to use them, and it will incorporate these extra vehicles into the scenario if you don’t do something about them.
The solution is to remove them. The mission editor allows you to remove unwanted units by selecting the offending vehicle, section, or platoon. When it turns pink, press ‘Delete’, and the unit goes away.
Okay, so now you know how to make a map and place units. The next step is to get them fighting each other.
"Deployment Zones"
A "deployment zone" is an area in which a player can move and position his units prior to the scenario starting. This allows the player to be able to "customize" his starting positions.
The easiest way to create a deployment zone (DZ), is to right click on the map in the scenario editor, select "New graphic" from the dropdown menu, and select "Rectangle" from the side menu. A black box will appear on the screen, which can then be manipulated to the required size. Next, select the rectangle (it will turn pink) by left clicking on one of its edges, and select "Deployment zone" from the dropdown menu.
Now that the DZ has been created, the mission designer can place units inside of it. While in the mission editor, the units will be able to be moved in and out of the DZ. This is normal. The constraints of DZ will only become apparent when the scenario is being played/tested.
Should you want to create multiple DZ's, the process is the same as above. However, to ensure that the player can only move unit A in DZ A, for example, change the colour of the DZ in the dropdown menu. This way, units will be confined inside of a DZ of a similar colour. This would be useful if you wanted to position different units in different areas of the map.
